A fellow artist (cartoonist) had requested me tips on how to go about 'untangling' and study this digital sketch of mine, which was an adaptation of a little figure study by Vinayak Karmarkar (the late, great Indian sculptor whose works I've recently studied at Sasawane, Maharashtra). So I posted a reply along with a few digital sketches, to explain how I went about doing it. I hope this will also be of some use to my kind visitor(s).
The digital sketch... (done with Mypaint 1.0 software and Wacom pen/tablet)

And my reply...
Hi, many thanks!
Indeed, a deceptively complex pose - worthy of study with ball or digital pen :) Below is a pic I have taken of the plaster cast kindly gifted to me. I did the study from a slightly higher point of view, but I think you'll still get an idea of how very 'tangled up' the pose is! Further below I've posted a few digital sketches, trying to break up (and clarify) the pose a little. Hope it helps.

Here I've omitted the upper limbs to give a clearer (albeit highly schematic) picture of the vertebral column (how it bends), the pelvic structure, the bending of the legs and the overlapping of feet. The red arrow indicates how the neck should bend forward, so that the chin may rest upon the left knee.

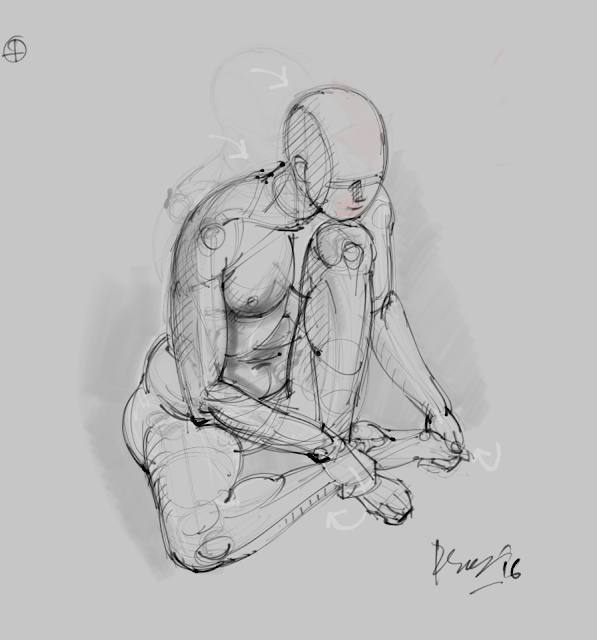
Here I've fleshed out the figure a little with the white outlines. Morever, the curved arrows in white indicate the various actions taking place in the pose e.g. curling of the right hand under the right leg (near ankle); of the left hand under the left toes. Since the vertebral column is bending forwards, its spines (not visible) will tend to stick out in the back, while the abdominal flesh/muscles will be compressed - thereby developing deep flexure lines. There is also pushing out/bulging of flesh here and there due to compression at various flexure sites (I have to say, as a cartoonist, you're already aware of squash and stretching, although in a different context)

The last pic further clarifies what I've mentioned just above. The flesh sticking out in the gluteal region to her right is a combination of muscle and fat, being compressed between the floor and her upper thigh, and between her pelvis and thigh. The extent of this bulging will vary between subjects and between genders. Similar bulging due to compression is seen in the abdominal area, and where the knees are flexing.
In my final study (on which you have commented, and which is posted at the top), the effect due to clothing is superimposed upon the naked figure. Of course, one needs to learn to visualize the underlying structure - bones, muscles, flesh and skin, in order to design the drapery more efficiently. I think, some amount of direct observation along with studied knowledge can help us decode any pose, however tangled/foreshortened. Thanks again for asking :)
The digital sketch... (done with Mypaint 1.0 software and Wacom pen/tablet)

And my reply...
Hi, many thanks!
Indeed, a deceptively complex pose - worthy of study with ball or digital pen :) Below is a pic I have taken of the plaster cast kindly gifted to me. I did the study from a slightly higher point of view, but I think you'll still get an idea of how very 'tangled up' the pose is! Further below I've posted a few digital sketches, trying to break up (and clarify) the pose a little. Hope it helps.

Here I've omitted the upper limbs to give a clearer (albeit highly schematic) picture of the vertebral column (how it bends), the pelvic structure, the bending of the legs and the overlapping of feet. The red arrow indicates how the neck should bend forward, so that the chin may rest upon the left knee.

Here I've fleshed out the figure a little with the white outlines. Morever, the curved arrows in white indicate the various actions taking place in the pose e.g. curling of the right hand under the right leg (near ankle); of the left hand under the left toes. Since the vertebral column is bending forwards, its spines (not visible) will tend to stick out in the back, while the abdominal flesh/muscles will be compressed - thereby developing deep flexure lines. There is also pushing out/bulging of flesh here and there due to compression at various flexure sites (I have to say, as a cartoonist, you're already aware of squash and stretching, although in a different context)

The last pic further clarifies what I've mentioned just above. The flesh sticking out in the gluteal region to her right is a combination of muscle and fat, being compressed between the floor and her upper thigh, and between her pelvis and thigh. The extent of this bulging will vary between subjects and between genders. Similar bulging due to compression is seen in the abdominal area, and where the knees are flexing.

In my final study (on which you have commented, and which is posted at the top), the effect due to clothing is superimposed upon the naked figure. Of course, one needs to learn to visualize the underlying structure - bones, muscles, flesh and skin, in order to design the drapery more efficiently. I think, some amount of direct observation along with studied knowledge can help us decode any pose, however tangled/foreshortened. Thanks again for asking :)


