Thursday, October 27, 2011

14 steps to Figure Drawing (UPDATED with pics!)

It looks formidable, all those numbers on that list! But with practice, one item tends to flow easily into the next, until it all becomes instinctive. I find this approach helpful, and had jotted it down in response to a friend's query on figure drawing. Thought I'd share it here as well...

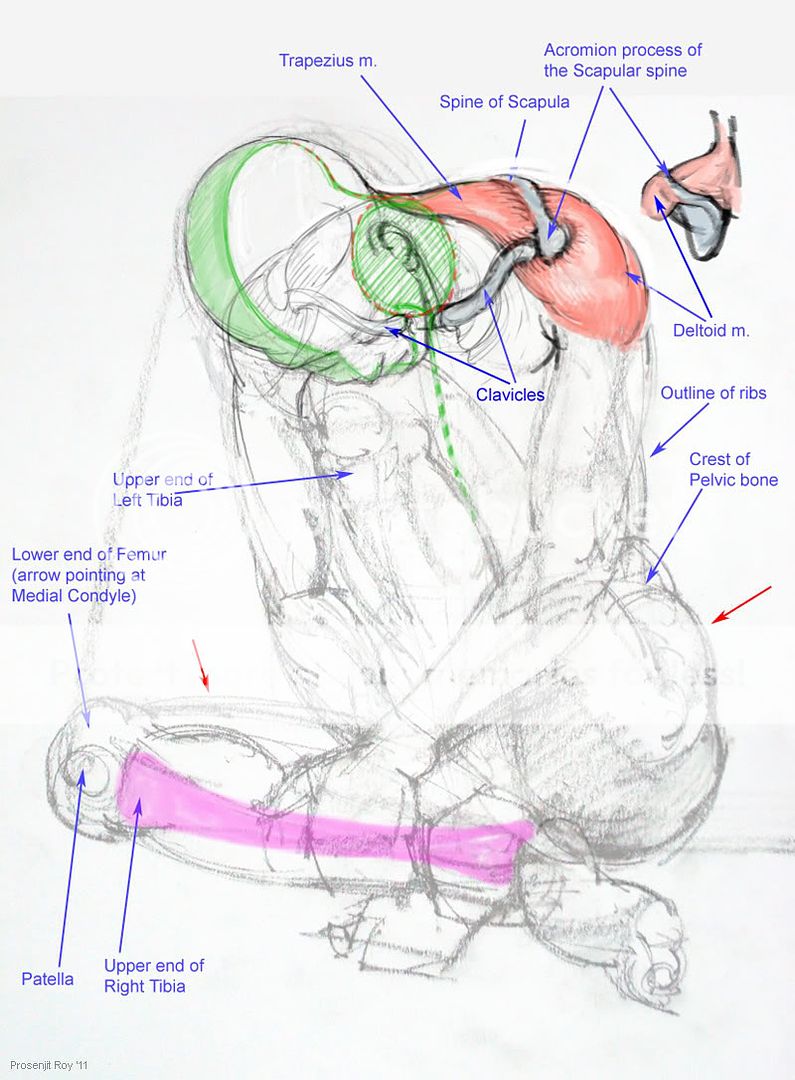
N.B. This was drawn from imagination. I do not claim anatomical perfection, although anatomy can always be improved upon, especially with the help of references. Nor is this a finished drawing, being merely a bare-bones, structural representation of the figure. I did not work upon surface details, things which breathe life and personality into the drawing... but that's a different issue altogether.

Just remember whenever you're stuck always go for the largest shapes...


1. Draw the head - no details... just a helmet shape, with its visor (which is flat vertically, and curved from side to side) symbolizing the face area, and the rounded top as the top half of the head.

2. Draw the neck (1/3rd of face, which is measured from an assumed hairline to the bottom of chin)

3. Draw the ends or points of the shoulder (widest point)

4. Draw the gesture of the spine (or the mid-line in this case)... how it curves, tilts, twists - upto the pubic bone (crotch). This is approx at or a little above the 4th Head Unit (1 head unit = height of the head from top of skull to bottom of chin)

5. Draw the outline of the chest's side walls (more or less parallel to the spine, but slightly converging, if that makes the slightest sense!)

6. Indicate the crotch.


7. Indicate the outer extent i.e. widest part of the pelvis (drop verticals from the shoulders to help you do this,or just hold the pencil vertically in front of your eyes). The widest part of the pelvis is around midway between navel and pubic bone. And the navel is usually a little below the third 'head unit'. The entire figure is like 7.5 head units approximately.

N.B. Note the curves in red (with arrow heads) - no curve in the figure's shape begins and ends abruptly at the 'outline' itself - they must be considered to be projecting into the substance of the body and emerging out of it on the other side, or whichever side its naturally curving to. This serves two purposes: 1) There is continuity or flow of shapes, one part can thus be related to another. 2)  The point at which the curve exits can be used as an added reference to properly place the shape-segment in the general outline of the figure.

8. Draw the gesture/action/pose of the legs...

A.S.I.S = Anterior Superior Illiac Spine

...just lines will suffice at this point. Indicate the inner aspect rather than the outer, since its closer to the mid-line and thereby easier to place. Also locate the heels w.r.t. the shoulders, i.e compare with verticals dropped from the latter. But more than that, see if the legs evenly balance the figure's weight. Unless its a mid-action pose, a vertical dropped from the pit of the neck (area in mid-line between clavicles) will pass mid-way between the two feet, or closest to the main weight bearing foot.

9. Indicate the knee

10. Bulge out the legs... it has a series of oppositely directed 'C' curves, curving forwards in the thigh, backwards in the calf region.


11. If its a female figure, you may draw the breasts now.


12. Draw the arms - as in the legs, start with the inner aspect first rather than the outer, since its easier to locate the inner side w.r.t. the chest contour. Again largely draw the arms' gesture/action/pose first, then flesh it out as necessary.


13. Don't get bogged down by fingers, fingers are not a priority as long as there are other things to take care of :) Draw the basic hand shape, indicating palm and the fingers area. (here's a pictorial tutorial on the basic hand shape).

14. And you have your figure!

No references were used for this demo

Monday, October 24, 2011

14 steps to Figure Drawing

>>> Edit: Please see updated version with pics.

It looks formidable, all those numbers on that list! But with practice, one item tends to flow easily into the next, until it all becomes instinctive. I find this approach helpful, and had jotted it down in response to a friend's query on figure drawing. Thought I'd share it here as well... Sorry, no pictures!

Just remember whenever you're stuck always go for the largest shapes...


  1. Draw the head - no details... just a helmet shape, with its visor (which is flat vertically, and curved from side to side) symbolizing the face area, and the rounded top as the top half of the head.
  2. Draw the neck (1/3rd of face, which is measured from an assumed hairline to the bottom of chin)

  3. Draw the ends or points of the shoulder (widest point)
  4. Draw the gesture of the spine (or the mid-line in this case)... how it curves, tilts, twists - upto the pubic bone (crotch). This is approx at or a little above the 4th Head Unit (1 head unit = height of the head from top of skull to bottom of chin)
  5. Draw the outline of the chest's side walls (more or less parallel to the spine, but slightly converging, if that makes the slightest sense!)

  6. Indicate the crotch.
  7. Indicate the outer extent i.e. widest part of the pelvis (drop verticals from the shoulders to help you do this,or just hold the pencil vertically in front of your eyes). The widest part of the pelvis is around midway between navel and pubic bone. And the navel is usually a little below the third 'head unit'. The entire figure is like 7.5 head units approximately.
    N.B. Note the curves in red (with arrow heads) - no curve in the figure's shape begins and ends abruptly at the 'outline' itself - they must be considered to be projecting into the substance of the body and emerging out of it on the other side, or whichever side its naturally curving to. This serves two purposes: 1) There is continuity or flow of shapes, one part can thus be related to another. 2)  The point at which the curve exits can be used as an added reference to properly place the shape-segment in the general outline of the figure.
  8. Draw the gesture/action/pose of the legs... ...just lines will suffice at this point. Indicate the inner aspect rather than the outer, since its closer to the mid-line and thereby easier to place. Also locate the heels w.r.t. the shoulders, i.e compare with verticals dropped from the latter. But more than that, see if the legs evenly balance the figure's weight. Unless its a mid-action pose, a vertical dropped from the pit of the neck (area in mid-line between clavicles) will pass mid-way between the two feet, or closest to the main weight bearing foot.

  9. Indicate the knee
  10. Bulge out the legs... it has a series of oppositely directed 'C' curves, curving forwards in the thigh, backwards in the calf region.
  11. If its a female figure, you may draw the breasts now.
  12. Draw the arms - as in the legs, start with the inner aspect first rather than the outer, since its easier to locate the inner side w.r.t. the chest contour. Again largely draw the arms' gesture/action/pose first, then flesh it out as necessary.
  13. Don't get bogged down by fingers, fingers are not a priority as long as there are other things to take care of :) Draw the basic hand shape, indicating palm and the fingers area.

  14. And you have your figure!

Regarding Shadows and Hands...

Posting these somewhat older pictures.. used to illustrate some discussion I was having elsewhere on the net.


How not to measure! (facial thirds)

Well I do this anyway, which is something I ought not to do, and use a pencil or a knitting needle instead. I know, I know...

Quick digital sketch with Mypaint: I did this for a lark for a friend who had queried what if there's no knitting needle (to measure facial thirds for portraiture) and the pencil (which can also be used likewise) was worn down to a mere stub. So I illustrated this easy to use, although somewhat inaccurate method to get the relative vertical dimensions of the face (see post below on the 'thirds' of the face).

Of course, one doesn't actually walk up to the model and measure on his/her face (that'd be a tad aggravating, I think)... there is a distance between the hand and the face.

Rough notes on Head Construction (Loomis' way)

Copied from what I wrote somewhere else on the net -

I thought I'd share these pictoral notes on head construction. There's also a 2nd pic added alongside this one, which has more explanatory text. These are adapted from the teachings of the late Andrew Loomis.

Note that we are drawing a head that's turned to the right, so the ear rather than the nose is central to the view. We draw the 'ear line' at right angles to the Equator, or the brow ridge line (indicating the bony ridge on which lies the eyebrows). The Central Vertical, which divides the face into halves is also drawn at right angles to the Equator. The CV is also at 90 degs to the ear line, as you can see in the pic.

Please click to see large version

As mentioned above, the 'Ear Line', which is at right angles to the Central Vertical, helps position the ear and the posterior border of the lower jaw. The ear is just behind the line, while the upright part (ramus) of the lower jaw is just in front.

Also note that D, which is = half of C (lower third of the face), indicates the position of the lower border of the lower lip.

In the pic below, the divisions/thirds of the facial plane are shown (a = b = c), which hangs like the visor of a helmet from the hemi-sphere which is the top half of the head.

Please click to see large version

These are adapted from my understanding of the teachings of the late Andrew Loomis. Below is a (slightly faster than) real time screen-capture video of me drawing a portrait using Loomis' principles. The reference was kindly provided by Lucretia, or Luicre, who has commented here. Software used to paint - Mypaint.

A few new and old...

Combination of various recent and (a little) older studies...

Approx A3 size paper, graphite.
Ref image by John Peri (JohnPeri in DA)
Composite of sketches on A3 size paper, Conte pencil.
Ref from various sources: on the right: Etsakoi in DA;
in the middle: Dora23 in DA; on the left: couldn't trace :(


A3 size paper, conte pencil, pastel for BG.
Ref couldn't be traced, probably a pic in
Dailymail. This is an old sketch.
Approx A3 paper, mixed media: conte,
watercolor. Ref image by Lightinsidemyhead in DA
A3 size paper, conte with water-soluble
pencil BG. Ref image by Cable9tuba in DA.
A3 size paper, conte, water-soluble
pencil for BG. Ref by Kanani Whitt in DA.

Monday, October 17, 2011

Older ones, may not have posted on website

The first one is basically a shape study in Gallery water-soluble crayons, the second one was done with Faber Castell watercolor pencils, although I didn't use water. The third one is a quick gesture study in conte.
Refs for 1 and 2 by Daniel Burns, model Cinnoman in DA (couldn't trace source ref for no. 3).

A3,  Gallery water-soluble crayons
A3,  Faber Castell watercolor pencils
A3, gesture study in conte

One from earlier in the evening... (Updated)

I'm updating this post with a new sketch of the same model (Brittani) and from same source ref (please see below).
A3 size paper, conte carbone pencil,
water-soluble pencil for background.


A quick(ish) conte study for something more detailed I have in mind... let's see. Ref image by Kanani Whitt  in DA.
Approx A3 size paper, conte pastel sticks

Friday, October 14, 2011

Reclined, sub-shapes study

I liked how the ref (by breakermorant1066 in DA) gave me an opportunity to study the sub-shapes (or should I say supra-shapes?). Also the lithe form of the model wonderfully lends itself to structure interpretation. There is such divine rhythm in the human body!
A3 size, conte stump and pencil.

Thursday, October 13, 2011

Sketches from 5.00 in the morning

The first is referenced from (the image of ) a work by the great, late Vinayak Karmarkar. Hard to believe that this is a statue poured in cement-mix! The second is from a Reuters pic of a cuffed Protestor. The phrase  beautiful rage comes to mind. I sketched it a couple of hours ago.
A3, conte pencil with conte sanguine BG

A3, conte carbone pencil. Inktense
water-soluble pencil for BG

Tuesday, October 11, 2011

Just uploading for the time being...

... am still looking for the reference sources, will add info as and when I find. The head is referenced from a picture of a plaster model.

1/4th sheet Canson pastel paper. White
conte and pastel. Ref source (pic of plaster
head) not yet traced.

A3 size, conte. Ref source not traced yet

A3, conte with pastel BG.
Ref image amdgfinearts in DA

Monday, October 10, 2011

A couple from the teaching desk

I was asked to comment on a newbie member's artwork in an art forum, and these are the graphics I prepared, based on the member's art. I drew the first one in my own way, but referenced the member's drawing for the pose. In the second one, I traced over the original in Photoshop, modifying form and shape as I went along (top-left). The shoulder anatomy, bone-joint lay out is something I drew to further elaborate on it. There were some issues with the shoulder and legs which I addressed.

Conte, finished digitally. Referenced
a drawing by katu06 in Wetcanvas.
The long blue arrow at the bottom points to the
shadow of the sub(or supra)-bulge on the shoulder.

Sunday, October 9, 2011

Mixed bag of figure studies in various media...

Something I did a little while back. I guess some of these are on my website, but uploading nonetheless... I need content for this blog :)
14" x 22", acrylic on paper. Ref image by courtesy
of Pascal Renoux; Model: Miss Buffet Froid

70 cm x 56 cm, acrylic on paper.
Ref image by posespace.com

Pastel sktech, A3 size paper. Peripheral
background was filled up digitally. Ref image
by Andrei of Vishstudio.

A3 size, watercolor pencils.
Ref image by Daniel Burns; Model: Tanis MacPhail

13" x 10.5", watercolor on handmade paper.
Ref image by Daniel Burns; Model: Tanis MacPhail 

More Old stuff...

Flickr didn't allow me to post the first of these, which is weird since they do have lots of accounts posting nude figure drawings. When I contacted them and pointed out the anomaly they said they only act when someone points out an account to them. In any case I do understand and honor the need for the rule for some viewers, even though I think its adequate if you put up a suitable warning, as Blogger does. In Flickr's case they have options like Safe, Moderate and Restricted (I have no idea what's the difference between the last two), but choosing anything other than Safe makes your pics inaccessible to non-members. In any case, there are so many offensive contents on the internet (and I'm not just talking about carnal displays here), a few images of figure studies of unclad human beings is hardly one of those, especially when museums and galleries abound with paintings and sculptures of the nude. Anyway, that's my opinion - even though I'm not the only one. Michelangelo :) ran into similar issues when painting the Sistine Chapel.

57 cm x 18 cm Acrylic on paper
Ref image by Hippiestock in DA

A3 size, conte (black and sanguine)
No idea where this was referenced from :(

A3 size, Conte
Ref image by Hong Ly

Friday, October 7, 2011

Acrylic male nude study + two more...

The image on the left is not very new. But I don't think I've displayed it in full on my website.
22" x 15", acrylic on paper.
Ref image by JustMeina in DA.


A3 size, conte.
Ref image by JdpPh in DA.


A3 size, conte carbone pencil.
Ref image by Robert Triboli


Wednesday, October 5, 2011

Trying out Figure Stack


My first post in Figure Stack... will be adding the image details later. Couldn't trace source references for the first two.. my apologies.
Conte sketch

Conte sketch
11" x 10", Water soluble crayons and pencils
Ref image by Volker Hartmann


11" x 10", water-soluble crayons and color
pencils. Ref image by Lead Birdie in DA